|
|
|
|
|
So you want to build a pond? |
| Step 1 –
Planning your pond Step 2 – Choosing a filter Step 3 – Digging the hole Step 4 – Placing the liner |
Step
5 - Filling with water Step 6 – Finishing the edges Step 7 – Decorating edges Step 8 – Adding a waterfall |
||||||||||||||||
|
When planning your pond you should consider a few important
things. There are two types of filters mechanical and biological (see chapter on water filters for details). |
|||||||||||||||||
|
|
|||||||||||||||||
| The filter should be included in the planning stage so it can be incorporated in a way to look natural, not added on later as an after thought. The filter will determine whether you have beautiful clean water or green pea soup that smells bad. | |||||||||||||||||
|
|
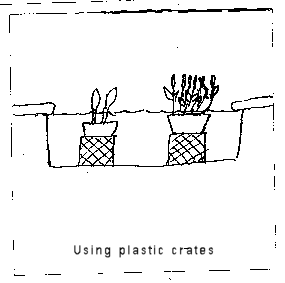
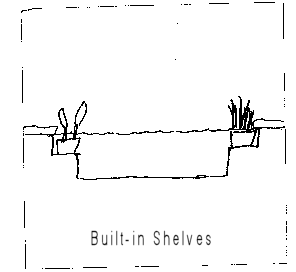
2. Do you want built in plant
shelves? Most books on pond building recommend building plant shelves 6” to 8” around the ponds edge, below water level. My experience is that not only do built in shelves reduce your water volume but they also provide a place for predators like raccoons and fish eating birds to stand in the water and catch your fish. |
||||||||||||||||
|
I prefer to use straight up pond sides and use plastic crates for plant stands. They are portable and provide coverage and shade for small fish. |
|||||||||||||||||
Step 2 – Choosing a filterThere are two basic types of water filters mechanical and
biological. Lets discuss the advantages and disadvantages of both. Mechanical filters trap debris in a filter pad.
An example is the filter on your air conditioner. Some water pumps come with a
pre filter to prevent debris from clogging the pump inlet. Advantages: Cleaning the pumps filter pad permanently removes
the debris from the pond. Disadvantages: Mechanical pumps are very high maintenance,
especially during algae season. If pads are not kept clean the pump can not move
water. Low water flow is a sure sign the pad needs to be cleaned. Biological Filters use beneficial bacteria and
natural enzymes to digest and recycle organic matter. These bacteria and enzymes
are present in all nonclorinated water. Advantages: A biofilter provides a good home for a
large number of bacteria to live. The bacteria need constant fresh moving water,
oxygen and food. If you provide a container, anything that holds water will do, filled with any filter media it will work. The filter media can be gravel, lava rock, hair curlers, bioballs, bioribbon, etc. The more surface area your filter media has the better it will work. The media does not clean the water. It provides a place for the bacteria to grow. Bacteria fills the voids between the filter media by growing in strings or filaments and works like a net to trap algae and eat it. The more oxygen in the water the more bacteria can live. Keep in mind that if you turn you pump off at least 80% of your bacteria will die overnight from lack of oxygen. |
|||||||||||||||||
|
|
|||||||||||||||||
|
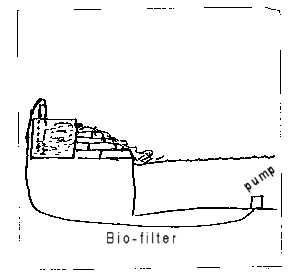
There should be an aeration tower or stand pipe, the taller the better. It should carry the input dirty water to the bottom of the container. The dirty water should free flow up through the media and gravity flow back into the pond. |
|||||||||||||||||
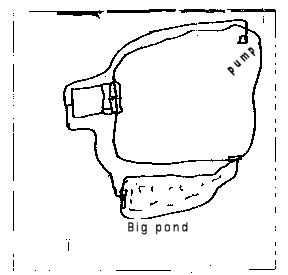
| Filter Pond is the method of biofilter I prefer, whenever it is possible to incorporate a filter/bog pond somewhere in the system where all or part of the water must pass through a lined pond filled with pea gravel. The water slowly passes through the gravel allowing debris to settle out. It works just like all biofilters but also provides a bog area for aquatic plants of all kinds. A large number of bog plants and trees should be planted without soil. | |||||||||||||||||
|
|||||||||||||||||
|
Algae – green water – needs three things
to survive, water, light and food. If you can deprive it of any one of these
things it will die. The bio bog plants use up all the nutrients and the algae
dies. When using a bio filter I place the pump in a mesh cage. The size of the mesh should be just a little smaller that intake of the pump so anything that goes through the screen will go through the pump and be caught in the biofilter. A biofilter can be built in as many ways as your imagination
can come up with. |
|||||||||||||||||
Step 3 – Digging the holeWhen digging the hole for your pond try to place each shovel full of dirt where it will stay. Hand digging is best if health and time permit. You will only dig what is needed and you can form the walls and floor as you go. Power equipment is necessary for bigger jobs. It is fast, expensive and destructive. The clean up job after using power equipment is sometimes more work and takes more time than if you had dug by hand. The depth of the pond should be between 1½ ft & 2½ to work well for fish and plants. Deeper water is ok but is more difficult to maintain. You need to be able to reach you plants and pump while keeping your head above water. The ponds edge should be fairly level to look natural. When the hole is dug, smooth the bottom with clean dirt or sand and slope it toward on low sump where the pump or bottom drain will be. This allows you to completely drain the pond if (God Forbid) it should be necessary. If you are using excavated dirt to build the base for your waterfall be sure to tamp and pack each later thoroughly. Build up the burms in layer or stair steps. This makes rock placement easier. Unpacked dirt will settle under the weight of your rocks causing problems later. |
|||||||||||||||||
Step 4 – Placing the linerIf there are any rocks or roots exposed you should protect you liner with some tough material. Anything will work, ½ inch of old newspaper, sand, erosion fabric, old nylon carpet or carpet pad. When you are ready to put in the liner, spread it out in the sun and it will become pliable, even on a cold day. Note – in the summer it will become to hot to handle!! Spread the liner in the hole and shape it as much as possible tucking and folding the corners and wrinkles. |
|||||||||||||||||
|
Now it is time to fill the pond completely with water. Let the weight of the water do most of the work. You should be in the pond where you can control the wrinkles as the water rises. |
|||||||||||||||||
|
Let the water be your guide for finishing the edge. The dirt should slope slightly away from the pond so the rocks will be more stable. If you have enough liner you can improve the finished look of your pond by building a rock shelf slightly below the water level, all or part way around the pond. Place smaller flat stones in the water on this shelf with the liner coming up behind them and out onto the bank. Trim the liner and bury the edge into a small trench. This secures the liner and prevents surface water from getting under the pond. Provide a controlled over flow for excessive rain by over filling the pond now and deciding where the best place for over flow will be. |
|||||||||||||||||
|
Now lets decorate the edge of our pond. Place the rocks around the rim testing each one to be sure it is stable and safe. A good test is to jump up and down on each one. If possible place the rocks so they over hang the water slightly, using the small flat rocks on the shelf as a base. |
|||||||||||||||||
| Step 8 – Adding a waterfall | |||||||||||||||||
|
|
|||||||||||||||||
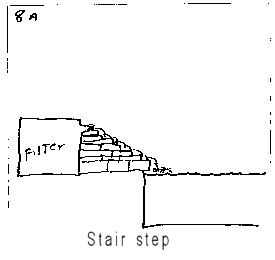
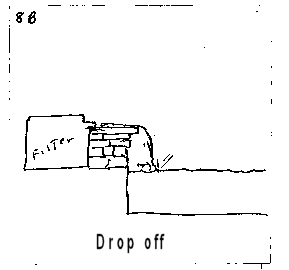
|
There are two types of waterfalls. Stair step or babbling brook and a straight drop directly into the water. Both are good and both aerate the water. To increase the sound of falling water you can build an echo chamber or grotto behind the waterfall to amplify the sound of the falling water. All waterfalls must have a foundation or a core to build on. This can be packed earth, concrete blocks or rocks. Cover the base or core with scrap liner so any water that gets behind the waterfall will go into the pond and not be lost. When placing the rocks that will carry the water, try to slope them slightly down toward the pond. The cracks in the waterfall can be sealed with cement mortar, which will also stabilize them. The mortar should be allowed to dry before running water over it. A product I have found useful is spray foam insulation in an aerosol can. You can find it at any building supply store. Do Not use water based latex foam. You can dry stack the waterfall rocks and when all is right, with the can upside down insert the plastic nozzle into the cracks and spray a bead of foam. Use sparingly. The foam will expand and you can add more if needed. If necessary use a pry bar to raise each rock slightly, spray, and set the rock down. The foam will stick to any dry surface. Allow the foam to dry at least 10 minutes and test the fall with water. If you need more foam dry the area with a blow dryer and reseal. If water tends to run off the sides of your waterfall, simply dry the area and using a small bead of foam, glue down a small flat rock to divert the water back onto the waterfall. The foam will stick to any dry surface (including you), it is nontoxic, waterproof and quite ugly! When the water is flowing where you want use a sharp knife and trim off the excess foam. The using a hand help propane torch gently melt the exposed foam back into the cracks. It will turn brown/black and virtually disappear. Soon natural moss and algae will complete the job. Feel free to e-mail further questions.
Remember advice is always free! |
|||||||||||||||||
|
|||||||||||||||||